Thursday, June 30, 2011

Dreamy Caramel


Are you ready for a mouth watering treat?


How about home made Caramel from Sweetened Condensed Milk
This recipe is so simple, easy and yummy.

There are different levels to cook the milk.
2 hours you will get Caramel Sauce- best with Ice Cream or drizzle over Coffee
3 hours you will get Caramel Pudding- best with a spoon and bowl
4 hours you will get a soft Caramel * This is what we are cooking today.*

Ingredients
1 can sweetened condensed milk


Take label off can.  In a very deep pot place unopened can.  Cover with water 3 - 4 inches above the can.  Bring the water to a boil for four hours.
**The can must be covered with water at all times.  Never let the water level get down to the top of the can.  This could cause the can to explode.**
  

After four hours remove the can with tongs and place on a wire rack to cool. 


Refrigerate.  Once the can is cold, open and you will have caramel. 
The color is even a beautiful rich caramel.

I serve the soft caramel on spoons.  Scoop caramel into a pastry decorator and squeeze onto spoons (and a little into your mouth).  We also add a dollop of whipped cream.


The only thing I can recommend is to boil more than one can.  You will want more!

 
If you are uncertain about boiling the can you can use one of these methods.


OVEN METHOD: Pour 1 14-ounce can sweetened condensed milk into 9-inch pie plate. Cover with aluminum foil; place in larger shallow pan. Fill larger pan with hot water. Bake at 425 degrees for 1 hour or until thick and caramel-colored. Beat until smooth.
STOVETOP METHOD: Pour sweetened condensed milk into top of double boiler; place over boiling water. Simmer over low heat for 1 to 1 1/2 hours or until thick and caramel-colored, stirring occasionally. Beat until smooth.
MICROWAVE METHOD: Pour sweetened condensed milk into a 2-quart glass measuring cup. Cook on 50-percent power (medium) 4 minutes, stirring briskly every 2 minutes until smooth. Cook on 30-percent power (medium-low) 20 to 25 minutes or until very thick and caramel-colored, stirring briskly every 4 minutes during the first 16 minutes and every 2 minutes during the last 4 to 10 minutes.
SLOW COOKER METHOD: Pour a can of sweetened condensed milk into slow cooker, set to low, stir every 45 minutes or so. Takes about 7 hours to turn into rich, brown caramel.

Life is uncertain.  Eat dessert first. 
~Ernestine Ulmer

Tuesday, June 21, 2011

Tailgate Tank Top

Are you looking for a fun, easy Tank Top to wear to the game?


Grab yourself a plain ole tank top.
You will also need some ribbon and thread in your school colors.

Our colors of choice are Purple and Gold.

Cut shoulder seams.


Fold edges 1 1/2" sew.  
This will make a loop to put ribbon thru. 


For an extra touch we added an applique design.
Applique is optional, but we used a
Fleur de Lis from
She has some very cute designs!


Loop the ribbon thru both side and make a bow.

Ta-da

You have a Tailgate Tank Top


Geaux Tigers!

Battle wound from Stevie

Stevie is the monster who lives in our work room.
Cute huh....

“We’re not here for the game. The game is nothing. The game is crap. The game makes me sick. The real reason we Americans put up with sports is for this: Behold, the tailgate party. The pinnacle of human achievement. Since the dawn of parking lots, man has sought to fill his gut with food and alcohol in anticipation of watching others exercise.” Homer Simpson

Sunday, June 19, 2011

Daddy's Cake

Happy Father's Day
to the wonderful men in our lives!

Daddy's Cake


4 Eggs (Room Temperature for 30 minutes)
2 Cups Flour
2 Cups Sugar
2 tsp Baking Powder
2 tsp Cinnamon
1/2 tsp Baking Soda
3 Cups Shredded Carrots
3/4 Cup Cooking Oil
1 Cup Chopped Nuts or Heath Bar (we use Heath Bar)
  1. Grease and flour two 9" round cake pans.  Heat oven to 350 degrees.
  2. In a large bowl stir together all dry ingredients.
  3. In a medium bowl beat eggs, mix in oil and carrots. 
  4. Add egg mixture to dry mixture; stir until combined.
  5. Pour batter into the pans.
  6. Bake for 25-30 minutes or until a toothpick comes out clean. 
  7. Cool on wire racks for 10 minutes.  Remove from pans and cool thoroughly on racks.
  8. While cooling make Cream Cheese Frosting (recipe below).
  9. Frost bottom layer sprinkle with nuts or chopped Heath.  Frost top and sides and sprinkle with nuts or Heath.


Family Cream Cheese Frosting

1 8oz Cream Cheese, softened
1/2 Cup Butter, softened (you can use margarine)
2 tsp Vanilla
6 cups Powdered Sugar
  1. Cream together cream cheese, butter and vanilla with mixer until light and fluffy.
  2. Gradually add 2 cups of sugar, mix well.  Gradually beat in sugar 1 cup at a time until you reach spreading consistency.
  3. Cover and store in refrigerator.
We like to add Heath Bar to the top and middle layer.

Yummy!

Sarah with her Pops and CAT Daddy
  
Suzette & CAT Daddy

Crazy Pops

Suzette & Pops

"By the time a man realizes that maybe his father was right, he usually has a son who thinks he's wrong." -- Charles Wadsworth


Friday, June 17, 2011

This "Root" Beer is for you!

This week we were so excited to guest post at Type A

We are also happy for Tammy and her family to have their huby and Daddy home!
Our mission today is to say THANK YOU to all of the men in our lives.

Happy Father's Day!


Thank You
Grazie
Merci
Danke
Mahalo

This one is for you CAT Daddy and Pops.

Personalized Beer/Root Beer Mugs

Yummy Root Beer Float

Supplies you will need:
Beer mugs (Dollar Tree)
Leather Lace
Leather
LeatherCraft Cement
1/4" Alphabet Set made for leather
Scissors
Hammer/mallet
Rubber band
Beer or Root Beer
Hugs & Kisses


1.  Wash and dry mugs.  Take special care to remove all of the price stickers. 

2.  Cut a long piece of leather lace to wrap around mug handle.  Working in small sections glue lace to mug handle.  Let dry.


3.  Cut leather larger than what you will need for mug. 

4.  Dampen leather (not too wet).  Let leather sit until it turns back to it's natural color and is cool.  It is now ready to stamp.  Keep leather damp while stamping.

5.  Mark center of leather (we cut a small slit in the bottom of leather). 


Place letters side by side over the center mark.  Make sure the letters are facing the correct direction (learn from me- please).


6.  Remove all letter except the 1st one to be stamped.  Insert setter and firmly strike with hammer/mallet.  Repeat as necessary.

7.  Place 1st stamp back in its impression.  Position 2nd stamp next to 1st for correct spacing.  Take away 1st stamp.  Insert setter into 2nd stamp.  Hit with hammer/mallet.

8.  Repeat for each letter.


9.  Cut leather to size for mug.  Glue with leather cement and hold in place with rubber band.  Let dry.


 10.  Wrap with a 6 pack of beer/root beer. 

11.  Give to your Daddy with lots of hugs and kisses.

CAT Daddy does not like beer, so we use root beer.  We made him his special Root Beer float.  It was GONE before we could get a picture of him enjoying his treat.


He said YUMMM...

Check out this GREAT idea on how to wrap a 6 pack The Idea Room.


Is this just not the cuetest idea - EVER?!?!

What will your mugs say?

Number
1
Dad

Greatest
Dad

Best
Dad

We went with the simple route - Last Name. 


Another version is to wrap the handle with wire.


The greatest gift I ever had
Came from God; I call him Dad!
~Author Unknown


Tuesday, June 14, 2011

Father's Day Guest Post

Today we are guest posting at Type A, so go visit Tammy.

We are showing you a fun way to say Thank You to the men in your life.


While visiting you get an extra Father's day idea from


Go take a peek and see...
Let us know what you think

The greatest gift I ever had
Came from God; I call him Dad!
~Author Unknown

Saturday, June 11, 2011

Fabric Clips

What can you do to make clips fun to work with?


BORING!


Add fabric scraps.
Our answer to everything!

This is a super easy way to add pizazz to plain clips.

Supplies:
Clips
Fabric scraps
Mod Podge
Scrap paper
Paint brush
Scissors or Rotary cutter


1.  Make template out of paper.  Trace clip onto paper.


2.  Cut fabric out of template.  Make sure to clip stray threads.


3.  Paint Mod Podge onto one side of Clip.  Start by placing edge of fabric with round part of clip.  Keep applying Mod Podge and fabric.  Rub fabric to get out any air bubbles.


4.  Hang clips to dry.  Apply another coate of Mod Podge.  This will also stop fraying of fabric.


5.  Now get to work and have FUN.


I use my clips on my hat hoop.


How will you use your clips?

Doing nothing is very hard to do...you never know when you're finished.
~ Leslie Nielsen ~

Wednesday, June 8, 2011

Moroccan Dream Stencil

Last week we were invited to share our "Painted Walls With Graphic Shapes at The CSI Project.  What a great feeling to do a guest tutorial with Jen and Beckie.

Can I tell you how scared and nervous we were to stencil?  But we are always up for the challenge and it turned out to be easier than we could imagine.


We used the Moroccan Dream stencil from Cutting Edge Stencils - they are amazing to work with.  I was so excited to get my package and find extra goodies in the box - Clip-on Stencil Lever and Fleur de Lis stencil.  With the stencil came great directions - Simple and Easy to follow.  Even we can do this...


This is what the design is to look like.


How did we do?

Here's what you'll need


Now you can roll your roller brush over the stencil with light to medium pressure.  Bleeding will happen if you use too much pressure.


Are you like me and have to see if you are doing "it" right?  You can take a peek to see.  Carefully peel back one of the corners and see.


Is it too light?  Am I using too much pressure?  Just check it and see.  Put the stencil back and roll more if needed.


Tips, Tricks and other notes

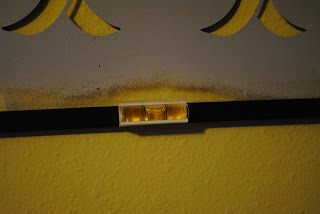
  • If using the level place on the bottom while doing ceiling.
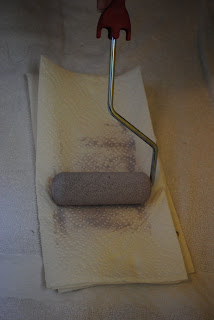
  • Less paint is more.
  • Wipe off fresh mistakes with a damp cloth.
  • Keep base coat handy
  • Taping stencil to both walls while in a corner will not produce good results.
  • Repairs- if you break a bridge in the design.  Fix with clear packing tape on both sides.
  • Re-Decorating (not that you will do this anytime soon), lightly sand walls and apply 2 coats of base coat paint.
  • Taking a break while in the middle of the project- cover paint tray and roller with plastic wrap or foil.  This will prevent the paint from drying out.


Now that you are finished with your 1st design, take off the stencil and step back and be amazed that you just made art.

Reposition the stencil using the design as your registration marks.  Make sure the design lines up.  Tape in place and start rolling.  Remember less paint is more.


Reposition, tape, roll and repeat.  It's that simple!

Corners, Baseboards, Ceilings:  
Not a big deal!  Tape half of stencil to one wall.  Roll brush into the corner or take small brush and fill in at corner.


Cleaning and Storage:
Let paint dry completely and simple peel off the paint skin, or you can soak the stencil in the sink or tub.  Pat dry with paper towels.  Store stencils flat.  Don't roll, unless it is your only option.


Sample board
Paint Sherwin-Williams base coat and stencil
Foam roller with rounded ends or stencil brush
Paint tray or styrofoam plate
Blue painters tape
Paper towels
Ladder (optional)
Clip-On Stencil Level (optional- but well worth it)


Getting Started:

Paint your walls with your base coat.  We used a flat paint in Friendly yellow from Sherwin-Williams as our base coat.  Let dry 24 hours before you stencil.

Great name for this "Friendly" yellow!

Practice, Practice, Practice and Practice some more!!!
Use your sample board to work out your method and color combo.

Tape the baseboards, ceilings and walls using 2" blue painters tape.

Now you are ready to start!  Since we are only doing one wall we started in the top left corner.  We used the Clip-on Stencil Level to check that the pattern is level.  Slide the level onto the top or bottom of your stencil.  Place your stencil on the wall and adjust until the bubble is centered between the black lines.  Fasten stencil with 4 -6 pieces of blue painters tape.


Pour about 2 - 3 tablespoons of paint into your tray/plate.  We used yummy Grape Mist paint.  You don't need much paint.  Load your roller brush by rolling it into the paint a couple of times.  Blot off the excess paint onto a folded paper towel by rolling it back and forth a few times until it the roller looks almost dry. 


Remember, less is more!


Emma & Stevie said break time (please)


 Check back often to see the progress of Katie's room.


To be continued...